Crafting a durable diy soap dispenser from an upcycled glass canning jar is one of the easiest ways to eliminate single-use plastic bottles while bringing vintage farmhouse character to your home. By drilling a clean hole in a metal lid, mounting a sturdy pump mechanism, and sealing the glass against daily sink splashes, you can create a refillable fixture that lasts for years.
This complete guide provides exact US budget estimates, safe metal-drilling techniques, rustproofing strategies, and waterproofing tips so your handmade DIY soap dispenser performs reliably day after day.
Commercial liquid hand soaps and dish detergents almost always come packaged in flimsy disposable plastic jugs. These containers clutter your countertop, crack under regular pressure, and contribute to household plastic waste.
In contrast, building your own glass pump container gives you total control over the appearance, size, and liquid capacity of your sink fixtures. Whether you need a heavy-duty container for grease-cutting kitchen soap or an elegant milk-glass accent for a guest powder room, learning how to assemble a custom DIY soap dispenser solves both functional and decorative needs.
Many crafters encounter common frustrations when attempting this DIY soap dispenser project for the first time: lids corrode into an unsightly orange mess within weeks, exterior paint chips away when wet, and loose pumps wobble during everyday use.
Fortunately, you can avoid every one of these problems with the right preparation, correct sealants, and proper hardware. If you enjoy practical, budget-friendly home updates, explore more creative DIY projects to upgrade your living spaces with repurposed items.
Why Make a DIY Soap Dispenser for Your Home?
Constructing a custom diy soap dispenser delivers immediate environmental, financial, and aesthetic benefits. Standard single-use plastic pumps cannot be easily recycled in most municipal waste systems due to the tiny metal springs inside the pump heads. When you transition to a refillable DIY soap dispenser, you can purchase liquid soap in bulk gallon jugs or mix concentrated refills at home, dramatically reducing your packaging footprint and monthly shopping expenses.
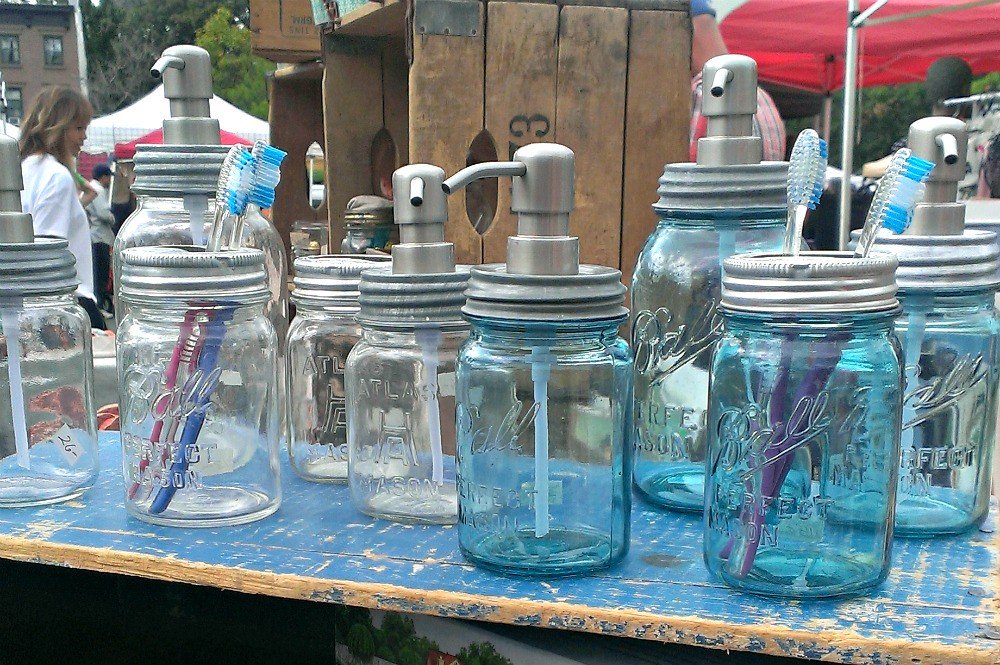
Beyond eco-friendly perks, an upcycled diy soap dispenser offers timeless decorative appeal. Canning jars feature classic embossed lettering, sturdy weighted bases that prevent tipping, and standardized threaded necks that accept a wide variety of lid accessories. A heavy glass base ensures that when you press down with one hand, the jar remains firmly planted on the granite or laminate surface rather than sliding around wet countertops.
Customization is another significant advantage of this handmade project. Commercial dispensers rarely match specific cabinet hardware or faucet finishes. When you build your own DIY soap dispenser, you can select pump hardware in brushed nickel, oil-rubbed bronze, matte black, or antique brass to complement your existing fixtures. For additional home styling inspiration that blends form with everyday function, take a look at our favorite kitchen styling and organizing ideas.
Itemized Materials and US Budget Breakdown for a DIY Soap Dispenser
One of the best aspects of creating a handmade diy soap dispenser is the exceptionally low cost. If you already own a jar and scrap wood, a basic build with a salvaged pump and a small tube of epoxy or silicone can land near $5 to $10.
Adding spray paint, a clear coat and a stainless lid pushes a full buy-everything build to roughly $15 to $25 (paint and sealant can be shared across projects). Find parts at hardware stores, dollar stores, and Amazon. Below is an itemized breakdown of what you need and typical US retail prices:
- Glass Canning Jar (Pint or Quart): Free if repurposed from pasta sauce or home preserves, or $1.25 to $2.00 at thrift stores and grocery retailers. Standard regular-mouth (70 mm) jars work best for a compact DIY soap dispenser.
- Dispenser Pump Mechanism: $1.25 when salvaged from a dollar-store lotion bottle, or $3.00 to $6.00 for a heavy-duty stainless steel replacement pump ordered online for your DIY soap dispenser.
- Metal Canning Lid and Ring Band: Included with canning jars, or roughly $0.50 each when purchased in multipacks at hardware stores.
- Water-Resistant Two-Part Epoxy or Clear Silicone: $4.00 to $6.00 per tube (provides enough adhesive for dozens of craft projects).
- Exterior Spray Paint and Clear Protective Enamel: $5.00 to $8.00 per can at home improvement centers (optional, for decorative painted finishes).
- Scrap Wood and Clamps: Free workshop scraps used as a safe drilling backing block.
- 220-Grit Sandpaper: $1.00 per sheet for smoothing cut metal edges and distressing raised glass lettering.
To keep costs minimal, source your pump mechanisms locally. You can find an affordable mason jar pump lid dollar tree option by purchasing a cheap plastic soap bottle solely to harvest its internal spring pump for your DIY soap dispenser. If you prefer specialty finishes or heavier weight, craft retailers offer dedicated hardware featuring threaded metal inserts designed specifically for canning jars.
Lid Options and Rust Prevention for Your DIY Soap Dispenser
The single most common reason a diy soap dispenser fails prematurely is corrosion around the lid opening. Standard canning lids are manufactured from thin tinplated steel designed for single-use vacuum food sealing, not continuous exposure to moisture and liquid detergents. When soap and water pool around the pump collar of your DIY soap dispenser, unprotected steel oxidizes rapidly, creating rust flakes that stain countertops and contaminate liquid soap.

To ensure your handmade diy soap dispenser achieves rust-proof performance, you have three reliable strategies. The first method is applying two generous coats of rust-inhibiting clear enamel spray, such as protective coatings from Rust-Oleum, over both sides of the drilled metal disc before installing the pump on your DIY soap dispenser. Sealing the freshly drilled, exposed bare steel edges prevents air and standing water from initiating corrosion.
The second option is upgrading your DIY soap dispenser with a 304-grade stainless steel one-piece lid insert. Stainless steel resists rust far better than tinplate, eliminating oxidation risks without requiring paint or protective clear coats. Look for 304 stainless regular-mouth (70 mm) lids and bands, usually about $3 to $8 on Amazon or in kitchen supply stores.
The third alternative involves sourcing a plastic lid insert for the DIY soap dispenser. Plastic lids do not rust, wipe clean effortlessly, and create a leak-tight seal against the glass rim, making them ideal for heavy-use family bathrooms.
Choosing the Right Pump for Your DIY Soap Dispenser
Selecting the proper pump determines how smoothly your finished DIY soap dispenser operates. Dispenser pumps come in three primary styles: standard liquid soap pumps, foaming pumps, and thick lotion pumps. Standard pumps suit thin to medium liquid soap. Thick lotions need a lotion pump with a wider tube and larger outlet. Foaming pumps incorporate an internal dual-chamber mechanism that blends liquid soap with air to produce lather in your DIY soap dispenser.
If you plan to use thick liquid detergents at your sink, avoid using delicate cosmetic pumps that struggle to pull viscous fluid upward. For those crafting a specialized diy soap dispenser for kitchen sink spaces, ensure your pump mechanism is compatible with concentrated degreasers.
Proper sizing of the internal plastic intake tube is equally vital for any DIY soap dispenser. To size the tube, measure from the pump base to the jar bottom, then trim so it ends about 1/4 inch above the bottom with a 45-degree cut. A diagonal cut prevents the tube from suctioning against the flat glass bottom, ensuring continuous liquid flow even when soap levels run low.
If you prefer storing bulk soap under the counter rather than refilling a small jar weekly, you can even install an extension tube on your DIY soap dispenser. This modification attaches several feet of flexible silicone tubing directly to the bottom of the pump stem, routing downward through your sink deck directly into a cost-effective bulk gallon jug stored inside the vanity.
Step-by-Step Guide: Building Your DIY Soap Dispenser
Constructing a durable, rattle-free diy soap dispenser takes less than an hour of active hands-on work. Follow these seven detailed steps to guarantee a secure fit, clean holes, and a resilient waterproof finish for your handmade DIY soap dispenser.

Step 1: Preparing and Cleaning the Glass Jar
Begin preparing your DIY soap dispenser by washing your glass jar thoroughly with hot water and grease-cutting dish detergent. If you are repurposing an old pickle or pasta jar, soak the glass in warm water mixed with baking soda to eliminate lingering food odors. Dry the exterior and interior completely with a microfiber cloth. Clean the threaded rim with isopropyl rubbing alcohol to remove any residual oils that could interfere with paint or sealant adhesion.
Step 2: Safe Drilling and Punching the Metal Lid
Drilling through thin metal canning lids for a DIY soap dispenser requires caution. Wear safety glasses and cut-resistant gloves, and never hold the lid by hand while drilling. Skip kitchen knives and twist bits, which tear thin metal and leave jagged edges.
Place your flat metal lid disc securely on top of a flat scrap block of wood. Mark the exact center of the lid with a permanent marker. Secure the lid to the wood block using a spring clamp or hold-down clamp. Chuck a step drill bit (unibit) into your variable-speed drill.
Position the tip of the bit on your center mark and run the drill at medium speed with steady downward pressure. The graduated steps of the bit cut a perfectly round hole without tearing the thin metal. Stop drilling once the hole matches the outer diameter of your DIY soap dispenser pump collar (typically 1/2 inch to 3/4 inch). A metal hole punch tool or a 1/2-inch punch set also works over scrap wood.
Step 3: Deburring and Smoothing Metal Edges
Remove the lid from the backing wood. The underside of the drilled opening will have slight metal burrs. Wrap a strip of 220-grit sandpaper around a wooden pencil or use a small needle file to smooth the inner perimeter of the hole. Rubbing away sharp burrs ensures the pump collar seats flush against the lid surface and prevents cuts during assembly of your DIY soap dispenser.
Step 4: Painting and Distressing for a Vintage Finish
If you desire an antique farmhouse aesthetic for your DIY soap dispenser, you can paint the exterior of the clear glass. White lacquer spray paint applied to clear glass can replicate the look of early 20th-century vintage milk glass. Leaving the interior of the glass jar unpainted ensures that liquid soap does not come into contact with paint chemicals, maintaining purity and preventing peeling in your DIY soap dispenser.
Paint should always go on glass cleaned with alcohol and cure per the can’s label. Wipe the exterior of the jar with rubbing alcohol. Apply two light, even coats of white lacquer or bonding primer, allowing fifteen minutes between coats.
Once dry, lightly sanding the raised embossed lettering on a painted Mason jar highlights the decorative details without stripping the surrounding finish. Rub 220-grit sandpaper gently over the raised brand letters until the clear glass peeks through, creating a classic distressed look.
Step 5: Waterproofing and Protective Sealing
Because sink areas experience continuous water splashing and damp hands, a painted finish on a sink dispenser may require extra protection against moisture, water splashes, and frequent handling. Spray two coats of clear water-resistant polyurethane or non-yellowing acrylic clear enamel over the entire painted exterior of your DIY soap dispenser. Allow the protective topcoat to cure fully for 24 hours before filling the DIY soap dispenser with water or soap.
Step 6: Mounting the Pump with Waterproof Adhesive
Insert the threaded stem of your pump mechanism through the top of the drilled metal lid. Use the flat disc from a two-piece lid, held down by the ring band. Check that the pump collar rests flat against the exterior surface of your DIY soap dispenser lid.
While basic hot glue might seem convenient, hot glue weakens rapidly when exposed to bathroom moisture and daily pumping vibration. A snug-fitting pump may need only a thin bead of silicone for a seal, but you can also secure the collar with water-resistant two-part epoxy or 100% silicone sealant.
Mix a small coin-sized puddle of two-part epoxy and apply it around the junction where the pump collar meets the lid. Keep epoxy or silicone on the outside rim of the pump collar only, away from the soap path, and let it cure fully (24 hours for epoxy, per package) before filling. Ensure the adhesive forms a continuous waterproof gasket without blocking the central intake opening of the DIY soap dispenser.
Step 7: Final Assembly and Testing
Trim your plastic intake straw to length using a sharp utility knife at a 45-degree angle. Push the straw firmly onto the pump barb. Fill your glass jar with liquid soap, leaving at least 1 inch of headspace at the top so the pump mechanism does not displace soap over the rim.
Screw the metal ring band down firmly to seal the DIY soap dispenser lid against the glass jar. Press the pump head three to five times to prime the chamber and begin dispensing from your new DIY soap dispenser.
Real-Life Example: Solving the Peeling Paint and Rust Problem
Here is an illustrative example: picture Sarah, a renter who wanted to reduce plastic waste and brighten up a compact apartment bathroom with a DIY soap dispenser. Sarah originally crafted a dispenser by poking a hole through a standard two-piece canning lid with a kitchen knife, coating the outside with leftover craft paint, and securing a pump with standard hot glue.
Within three weeks, sink splashes caused the craft paint to bubble around the rim, the bare tin lid began showing orange rust streaks, and the glue joint failed when someone pressed the DIY soap dispenser pump too firmly.
Rather than giving up on a handmade diy soap dispenser, Sarah restarted the project with a smarter strategy: using a step drill bit over scrap wood for a perfectly smooth opening, upgrading to a stainless steel lid band, coating the exterior with water-resistant lacquer, and bonding the pump collar with waterproof two-part epoxy. With these upgrades, a dispenser like this should stay rust-free and intact far longer, because each known failure point has been addressed.
Customizing Your DIY Soap Dispenser Design
A major benefit of crafting a handmade diy soap dispenser is tailoring its look to match your home’s unique interior decor. You are not limited to plain white paint; numerous design variations can turn simple glassware into striking accents. If you enjoy coordinated sink arrangements, explore our curated bathroom upgrade ideas to match your DIY soap dispenser with matching toothbrush holders and storage trays.
For a matte modern farmhouse look on your glassware, apply ultra-matte chalk finish paint in sage green, charcoal gray, or soft linen. Chalk paint adheres exceptionally well to glass surfaces. After distressing the raised lettering with fine sandpaper, seal the chalk paint with water-resistant paste wax or a clear matte spray sealer to prevent water spots from darkening the finish of your DIY soap dispenser.
Another popular approach is the frosted sea-glass effect. Specialty semi-translucent frosted glass spray paint transforms standard clear jars into soft, diffused containers reminiscent of tumbled ocean glass. This finish looks particularly stunning when your DIY soap dispenser is filled with pale blue or green liquid hand soaps, offering subtle coastal charm.
For a tinted look, thin a few drops of glass stain or use a transparent tinted glass spray in amber or aqua, then seal with a clear coat.
If you prefer an industrial or vintage apothecary aesthetic, start with an amber or cobalt blue canning jar rather than clear glass. Leave the colored glass unpainted to showcase the rich hue, and pair it with a matte black metal pump. The dark amber glass protects natural liquid Castile soaps from ultraviolet light degradation while providing a clean, masculine look suitable for a kitchen or workshop DIY soap dispenser.
You can also create a matching set by crafting two complementary jars: one pint-sized jar labeled for hand soap and a second quart-sized diy soap dispenser designated for dishwashing liquid. Displaying both containers side-by-side on a small wooden pedestal or ceramic tray keeps your kitchen sink organized, functional, and visually balanced.
Comparison of Lid and Pump Materials for a DIY Soap Dispenser
Choosing the right combination of lid materials and pump hardware determines the longevity, cost, and maintenance requirements of your diy soap dispenser. Use the comparison table below to determine which components best fit your household budget and daily usage patterns for your DIY soap dispenser:
| Lid and Pump Combination | Estimated Cost (USD) | Rust Resistance | Expected Durability (general) | Best Application |
|---|---|---|---|---|
| Standard Tinplate Lid + Recycled Plastic Pump | $1.00 – $2.50 | Low (requires clear seal coats) | Moderate | Budget guest baths with infrequent use |
| Coated Tinplate Lid + Metal Dispenser Pump | $3.50 – $6.00 | Moderate (sealed against moisture) | Good | Bathrooms with moderate daily use |
| 304 Stainless Steel Lid + Stainless Steel Pump | $6.00 – $10.00 | High (resists rust well) | Very good | Heavy-use family kitchen and master sinks |
| One-Piece Heavy Plastic Lid + Foaming Pump | $4.00 – $7.50 | Not applicable (no metal lid) | Good | Children’s bathrooms and utility laundry rooms |
Investing in higher-grade materials pays off in heavily trafficked areas. While repurposing a plastic pump from a dollar-store bottle is an excellent low-cost solution, upgrading to stainless steel ensures that your DIY soap dispenser build withstands years of continuous wet-hand pumping without tarnishing or loosening.
Troubleshooting Common DIY Soap Dispenser Problems
Even a well-built diy soap dispenser can occasionally run into minor mechanical hiccups. Most dispenser problems stem from simple air leaks, clogs, or viscosity issues that you can resolve in minutes without replacing the entire assembly.
The Pump Loses Prime or Fails to Dispense
If your pump mechanism depresses smoothly but fails to draw liquid upward, the internal intake check-valve has likely lost its prime. First, verify that the liquid level in your jar covers the bottom of the intake tube. Next, inspect the plastic straw where it connects to the pump barb.
If the connection is loose, air enters the line, breaking the hydraulic suction. Remove the straw, trim away 1/4 inch of the stretched end, and push it back firmly onto the barb. You can also prime stubborn pumps by placing your finger over the dispensing spout on the upward return stroke, creating a vacuum that pulls soap into the upper chamber.
Liquid Soap Squirts Out Horizontally
When soap shoots straight across the room rather than dropping into your palm, the culprit is dried soap buildup inside the dispensing nozzle. Gel soaps dry into hard plugs when left unused for several days. Straighten a metal paperclip and gently insert it into the tip of the spout to clear dried residue. Flushing the pump with warm tap water every month prevents clogs from forming.
The Metal Lid Ring Sticks to the Glass
Over time, stray drops of soap can run down the exterior threads of the jar, drying into a glue-like seal that makes refilling difficult. If your mason jar lid becomes stuck, run warm tap water over the neck of the jar for 60 seconds to dissolve dried soap residue. To prevent sticking in the future, wipe the glass threads clean with a damp cloth whenever you refill the container.
Foaming Soap Dispenses as Watery Liquid
If you build a foaming diy soap dispenser and the output feels thin or watery, your soap-to-water dilution ratio is incorrect. Foaming pumps cannot process straight, undiluted liquid soap. The ideal ratio is one part liquid soap to four or five parts warm distilled water.
Gently swirl the jar to combine the liquids without shaking violently, which creates premature bubbles. Distilled water is strongly recommended, as the minerals in hard tap water can breed bacteria and clog delicate foaming screens over time.
Cleaning and Long-Term Maintenance for Your DIY Soap Dispenser
To keep your diy soap dispenser operating smoothly and looking pristine, establish a simple seasonal cleaning routine. Routine maintenance takes only five minutes and extends the lifespan of both the pump mechanism and the protective exterior finish.
Every three to four months, empty the remaining liquid soap and submerge the pump mechanism in a bowl of hot water. Pump clean water through the stem until the discharge runs clear of soap residue. This dissolves mineral deposits and sticky gel buildup inside the internal spring chamber. The CDC recommends washing hands with soap and water, so keep your dispenser clean and filled.
When cleaning the exterior of a painted glass jar, never place the container in a dishwasher or submerge it in standing water. Harsh dishwasher detergents and high water temperatures will strip decorative paint and break down waterproof epoxy seals. Instead, wipe the outside of the jar gently with a damp microfiber cloth and mild dish soap, then dry immediately with a clean towel to preserve the finish.
Frequently Asked Questions
How to turn a mason jar into a soap dispenser?
To convert an ordinary canning jar into a functional DIY soap dispenser, drill a central hole through the metal lid using a step drill bit backed by scrap wood. Smooth any rough burrs with fine sandpaper, insert a salvaged or new dispenser pump through the hole, and seal the outside rim of the pump collar with a thin bead of water-resistant epoxy or silicone, keeping it away from the soap path and letting it cure fully before filling. Trim the intake tube at a 45-degree angle, fill with soap, and screw the ring band tight.
How to make soap dispenser at home?
Making a DIY soap dispenser at home requires an upcycled glass container, a compatible pump mechanism, and water-resistant adhesive. Prepare the lid by cutting an opening matching your pump collar, coat the metal with rustproof sealant, and mount the pump securely. You can customize the glass exterior with water-resistant spray paint or distressed chalk paint, ensuring the interior remains unpainted to avoid chemical contact with your liquid soap.
How to make soap dispenser foam?
To convert your container into a foaming DIY soap dispenser, install a dedicated dual-chamber foaming pump rather than a standard liquid pump. Fill the jar with four parts distilled water and one part liquid Castile or gel hand soap, leaving at least 1.5 inches of headspace. Swirl gently to blend. The pump injects air into the diluted soap solution during depression, creating rich foam without clogging.
How to make soap dispenser work?
If a pump stops dispensing, check for clogs or broken suction. Clear dried soap from the spout tip using a paperclip or warm water rinse. Ensure the plastic intake tube fits tightly on the pump barb without cracks. Prime the mechanism by pumping rapidly while covering the spout with your finger on the upstroke to force liquid into the vacuum chamber.
Sources
Inspiration came from a Homedit mason jar soap dispenser project; general handwashing guidance is from the CDC.